What is the .htaccess File?
>>> Shared from Original Post iThemes
The .htaccess file is a powerful website file that controls high-level configuration of your website. On servers that run Apache (a web server software), the .htaccess file allows you to make changes to your website’s configuration without having to edit server configuration files.
In this guide to the .htacess file, we answer what the .htaccess file is, how to use the .htaccess file and how to locate it on your server, and more.
.htaccess Location
Where is the .htaccess file located?
Apache (the software that powers your web server) is configured so that all files named .htaccess are hidden. Why? The files have important configuration information and can be used to compromise your server.
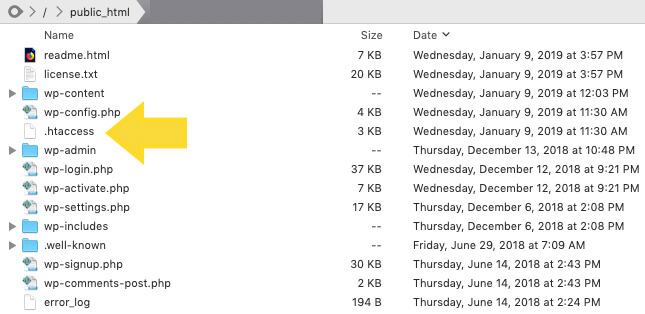
Although the file is hidden, the .htaccess file location is most commonly found in your website’s public_html folder.
You can access your .htaccess file in a few different ways:
- From your hosting account’s file management (such as via cPanel)
- From an sFTP or FTP client
Tip: If you don’t see your .htaccess file in your public_html folder, you may have to check “Show Hidden Files.”
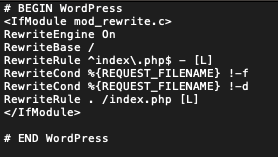
Once you open the .htaccess file, it should look something like this:
Common Uses of .htaccess File
There are several use cases for the .htaccess file. The most common examples include:
- Add redirections for certain URLs
- Load custom error pages, like 404 pages
- Force your site to use HTTPS instead of HTTP
- Password-protect certain directories on your server
- Prevent hotlinking
Using .htaccess files is a powerful tool for managing your server, but it can be tricky. Make sure you are familiar with making changes to your server before you start editing .htaccess files.
Using Multiple .htaccess Files
You can apply different settings to different directories on your server by using multiple .htaccess files. You can, theoretically, create a .htaccess file in any directory on your server by creating and uploading a plain text file.
Here are a few things to keep in mind:
- Generally, you want to minimize the number of .htaccess files on your server because too many configurations can slow your server down.
- When your server sees a .htaccess file in a directory, it looks for .htaccess files in all the parent directories, too, increasing server resource usage.
- .htaccess files that are higher up in the file path always take precedence.
How to Edit Your .htaccess file
If you need to edit your .htaccess file, you’ll need to either download the existing file using your FTP client or via your host’s file access system, such as within cPanel.
Your website’s .htaccess file may already contain important settings. If your .htaccess file has existing settings, add the new code to what is already there.
How to Redirect URLs with the .htaccess File
If you decide to change domain names or change the organization of your site, you can set up URL redirects to make sure your website visitors aren’t confused. An easy way to do this is with .htaccess files.
To edit your .htaccess file, you will need to re-create the file yourself and upload it to the server using SFTP.
- 1. Log into your server via SFTP.
- 2. Locate and download your .htaccess file. It will usually be located in your content folder. If you don’t have a .htaccess file, you can create a file called .htaccess on your computer to hold your configurations.
- 3. Open the file via your favorite text editor
- 4. Add these lines to your file:
# enable basic rewriting
RewriteEngine on
- 5. Copy and paste your new configurations into the .htaccess file and save the file.
- 6. Upload this back to the directory you originally took your .htaccess file from.
- 7. Test your work by going to your website and viewing the pages you wanted to redirect.
URL Rewrites with .htaccess
Rewrites are similar to redirects because they also point one target URL to another URL, but this is actually converted by the web server while handling the traffic. Think of it as using a pencil and eraser to change a name as opposed to using a sign to point to the new name.
The most common URL rewrites force sites to have URLs either with or without www in the URL.
Forcing Non-WWW Site Addresses
When you add this information to your .htaccess file, any visitors who type in www.mysite.com will be sent to mysite.com.
Options +FollowSymLinks
RewriteEngine on
RewriteCond %{HTTP_HOST} .
RewriteCond %{HTTP_HOST} !^mysite\.com
RewriteRule (.*) http://mysite.com/$1 [R=301,L]
Replace mysite.com with your domain. If you have a different top-level domain (e.g., .net or .org instead of .com), use that top-level domain instead of .com/ Don’t remove the “\” as it is needed for the correct syntax.
Forcing WWW Site Addresses with .htaccess
Options +FollowSymLinks
RewriteEngine on
RewriteCond %{HTTP_HOST} ^mysite.com [NC]
RewriteRule ^(.*)$ http://www.mysite.com/$1 [L,R=301]
Replace mysite.com with your domain. If you have a different top-level domain (e.g., .net or .org instead of .com), use that top-level domain instead of “.com.” Note: Don’t remove the “\” as it is needed for the correct syntax.
Creating a Custom 404 Error Page with .htaccess
What is a 404 page? A 404 page is actually an error message that displays for pages that don’t actually exist on a website. A 404 page usually reads “Page Not Found” but you can also find examples of funny 404 pages that have been customized to give website visitors a better experience.
Error pages are a part of any website. No matter what, website visitors will sometimes encounter error pages. If you use custom error pages, you can turn an error page into a positive experience with funny 404 pages.
Next, we’ll show how to add custom error pages to your websites using .htaccess.

Before you set up your error pages, you’ll need to create your error pages. You can do this however you’d like: hand coding your page, using a site builder or another way. When you’re done building your error page, save the file so it can be uploaded to your server.
Now to set up custom error pages, you will edit your website’s .htaccess file.
- 1. Before editing your .htaccess file, upload your customized error pages to your server. You can do this via SFTP. Put these files in the content directory for your website.
- 2. Log into your server via SFTP using the FTP program of your choice.
- 3. Download the .htaccess file that corresponds to the domain where you want to use custom error pages.
- 4. Open this file in a text editor and add this information:
# serve custom error pages
ErrorDocument 400 /errors/400.html
- 5. Replace /errors/400.html with the file path to an error page you have uploaded. This example has “400,” for a 400 error.
- 6. Add as many lines as needed, changing the error number and the file path as needed.
ErrorDocument 500
ErrorDocument 404
ETC...
- 7. When you’re done adding to your .htaccess file, save and exit the file. Then upload it back to the directory you got it from.
- 8. Finally, test your website to make sure your error pages are functioning.
Forcing HTTPS with .htaccess
If you want to make sure every website visitor is using a secure (SSL) connection, you can use .htaccess rules to redirect insecure traffic. This will redirect http://mysite.com to https://mysite.com. Of course, this will only work if you have an SSL installed for your domain. To that end, all iThemes Hosting accounts do come with a free Let’s Encrypt SSL.
To redirect every website visitor to a secure connection, add this rule to the .htaccess file for the website you’d like the redirect:
#force SSL on entire site
RewriteEngine On
RewriteCond %{HTTPS} !=on
RewriteRule ^/?(.*) https://mysite.com/$1 [R=301,L]
You will need to replace mysite.com with the actual domain of your site.
Password Protecting Directories with .htaccess
During development, testing and creation of your website, you may want to password protect your site until it’s ready for public viewing. You may also have specific pages or web directories you’d like to lock down to specific users. The .htaccess file is a powerful tool to help you accomplish this within the iThemes Hosting framework. Next, we’ll walk through creating a password to protect your website, directories and other components of your site.
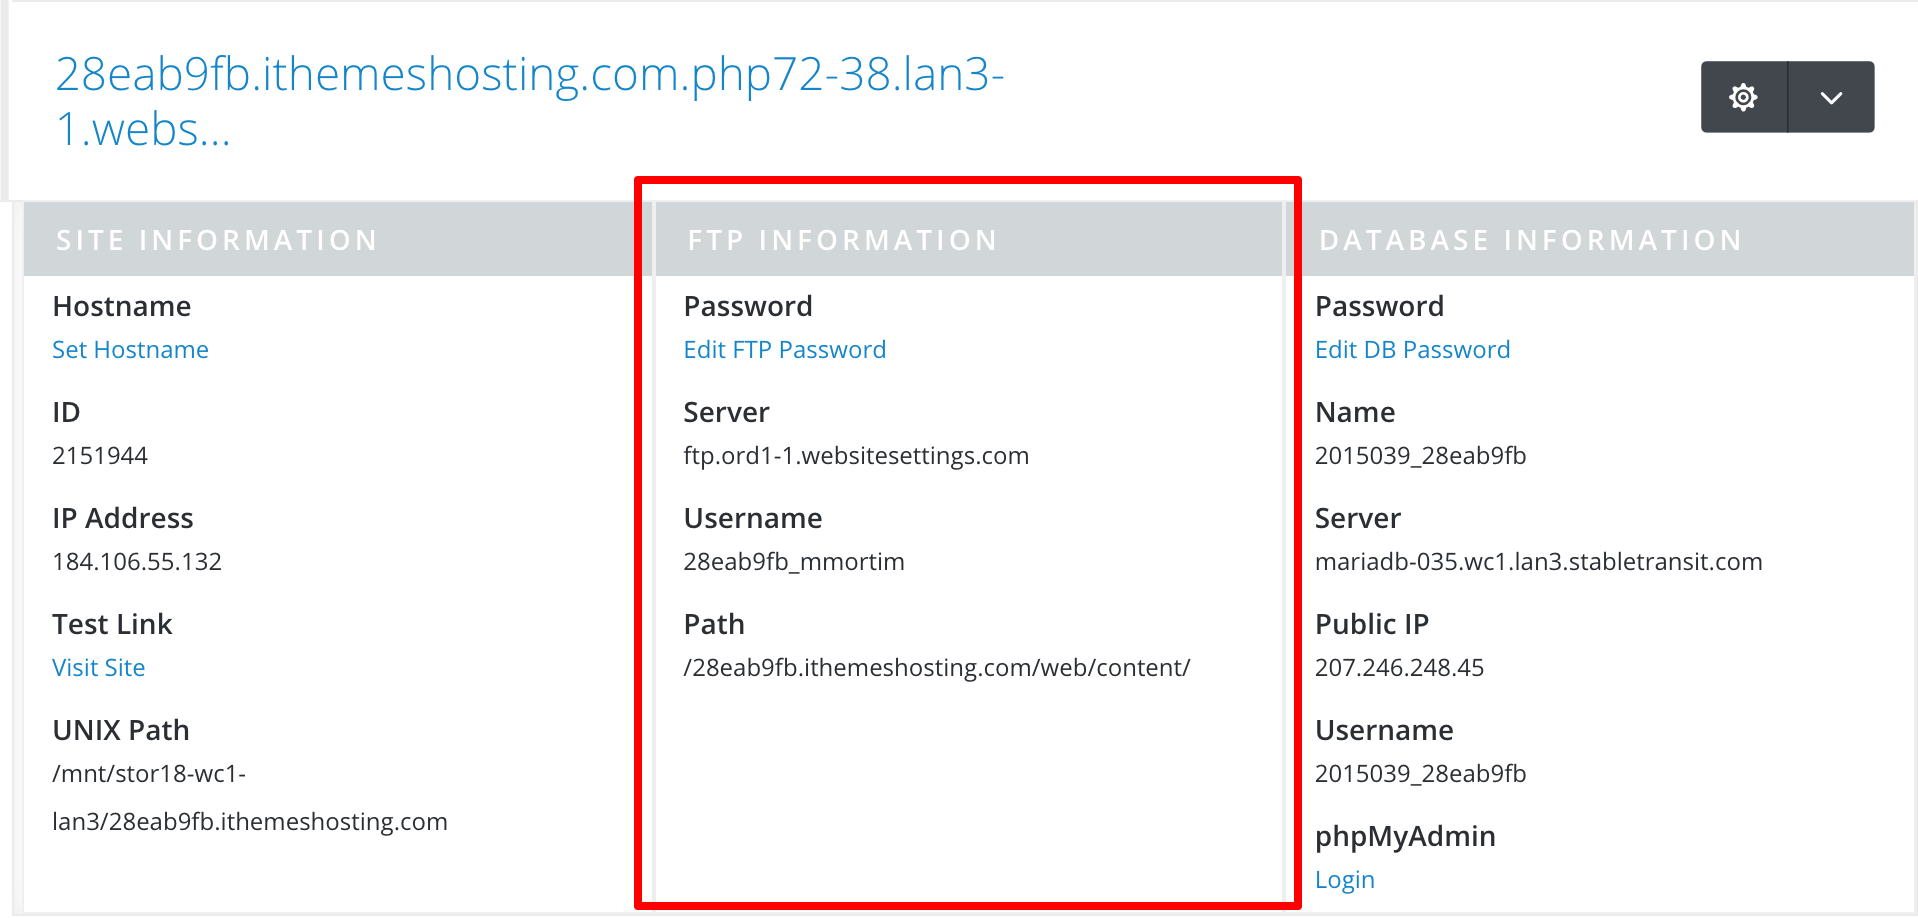
- 1. First, you will need access to the Document Root for the site. This is where you will house the .htaccess file and also the .htpasswd file in order to password protect your site. The file path will look something like this:
/eed292b5.ithemeshosting.com/web/content/
It will be found in the SFTP information section with the title of “Path” on your iThemes Hosting page in Sync. Make sure you are using the FTP Information path and not the UNIX Path.
- 2. The .htpasswd file should be placed one directory up from the site root and kept separate from the .htaccess file.
- 3. You will need to generate the syntax for the .htaccess and the .htpasswd files. You can use any site you’d like but for the purpose of this article, I am using http://tools.dynamicdrive.com.
- 4. Once you follow the steps to create the files, you will need to place the syntax on your server. If you already have a .htaccess file on your site, you can append the file and add the additional syntax.
- 5. Upload the .htpasswd file to the location you determined in step 2.
- 6. Check the permissions of the files to make sure the users you want to have permissions will be able to access them.
Hotlink Protection with .htaccess
What is hotlinking? When creating a website, admins usually add images and other content to make the website look better and add some character. In doing so, you usually upload an image and add it to your pages to be viewed. It is also possible, though not recommended, to use images that have been uploaded by others without needing to download and then upload that image to your site. This is called hotlinking.
Unfortunately, for people whose images have been hotlinked by other websites, they will likely notice an increase in their server resource usage as the new site using those images will be using your server’s resources.
Fortunately, you can prevent this by enabling hotlink protection on your site. Here is how to go through the process of enabling hotlink protection on your site.
- 1. First, you will need to sign into your site via SFTP
- 2. You will now need to download the .htaccess file from your /web/content folder
- 3. Once you’ve got the .htaccess file on your computer you will want to add the following lines to that file:
RewriteEngine on RewriteCond %{HTTP_REFERER} !^$ RewriteCond %{HTTP_REFERER} !^http://(www\.)mydomain.com/.*$ [NC] RewriteRule \. - 4. Make sure that you alter mydomain.com to match your domain. Also, please be sure that you do not modify any other code within the .htaccess file.
- 5. Once you’ve added the above lines, you will then want to upload the .htaccess file back to your /web/content directory
- 6. Once uploaded, disconnect from SFTP and check your site to make sure that there are no errors.
Secure & Protect Your WordPress Website
Every WordPress website needs a solid backup and security strategy. With BackupBuddy, our WordPress backup plugin, and iThemes Security Pro, our WordPress security plugin, you get backups and security … plus peace of mind that your content is safe.
The post What is the .htaccess File? appeared first on iThemes.
>>> Read the Full Story at iThemes

- Kristen Wright
- Read the 2021 WordPress Vulnerability Annual Report January 26, 2022
- WordPress 5.9: Top 20 New Features & Improvements January 24, 2022
- What is the .htaccess File? January 18, 2022
- New! An Easy and Free Way to Sell Premium Content with WordPress January 13, 2022